

Driving out of my neighborhood one morning, I spotted a Barbie dollhouse. It was old, it was simple, and it was emblazoned with the Barbie logo…but it was only $5! I couldn’t pass it up. My husband and the neighbor’s son walked it over to our driveway, and the transformation began. The dollhouse went from Retro Barbie Glam to Cottage Chic.

I’m not a DIY’er. I’d like to be, but that’s just not my calling. However, I love interior decorating. And I believe in repurposing and recycling. So while this dollhouse may not be the snazziest version on the block, I think I achieved my goals!
I started with paint. We don’t have a playroom. Knowing this 4- foot house would take center stage in one of my girl’s bedroom, I had to paint it. The majority of her bedroom furniture is white, and therefore, the perfect choice to refinish the dollhouse.
I chose a white interior paint that is both primer and paint in one. It still took me a good 2-3 coats to cover the bright Barbie colors. I did not sand, I simply wiped off the dirt and cobwebs and peeled off the Tinker-Bell stickers before applying the paint. 🙂 I used a stencil to paint a black chevron pattern on the top level floor.
Once all the paint was dry, I brought the dollhouse inside for the next phase… wallpaper, artwork, rugs, doors and windows, and other final touches.

Cardboard Doll House
For much of the interior work, I utilized pieces from the girls old cardboard dollhouse. It was a heavy-duty gloss white cardboard. You’ll see remnants of the white cardboard house as we go.
Let me take you on a tour tutorial, room-by-room. We’ll start with the top floor. I dubbed this floor the Attic. I created a Bathroom and Bedroom on this floor.
Attic Floor

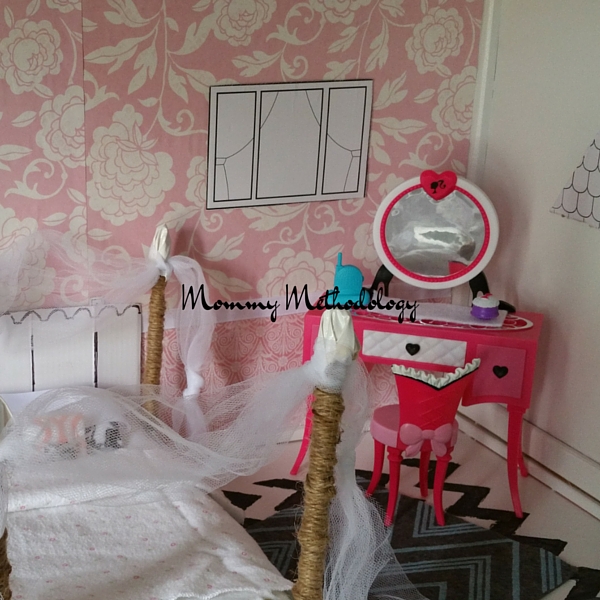
Attic Bathroom

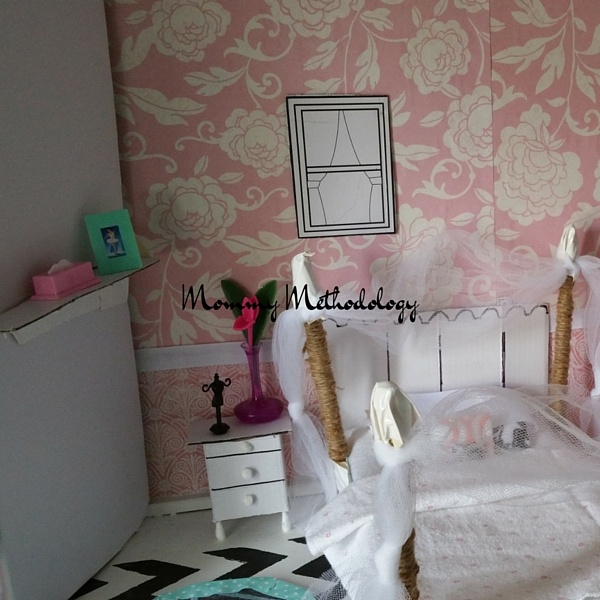
Attic Bedroom
All floors of the dollhouse are open, they lack room dividers or partitions. Rather than cut and paint wood for walls, I decided to utilize the floors from the girl’s cardboard dollhouse as room partitions. Placed vertically, they are the perfect height to wedge into the top floor and middle floor of the dollhouse. This allowed me to make multiple rooms for each of those floors. The partition only extends marginally into the room which actually gives the girls more play area on each floor since the front of the dollhouse is somewhat enclosed.
- The faux attic roofline and window were created by taping a cutout from the cardboard dollhouse on the two end walls of the floor. I used simple scotch tape, doubling it up to make the double-backed tape, to adhere the cardboard to the wall.
- The windows and lantern were glued, using Elmers glue, onto the back wall, over the wallpaper.
- The wallpaper was created by gluing craft scrapbook paper onto the back wall.
- The molding was created by gluing leftover craft ribbon onto the wallpaper where the two complementing patterns meet.
- The round mirror was created by applying tin foil to a circular cardboard cutout.
Next, we move onto the second level of the doll house. Here I partitioned the floor into a Dining Room and a Kitchen.
2nd Floor

Dining Room

Dollhouse Kitchen
- The windows were either taped with double-backed tape onto the side walls or glued, using Elmers glue, onto the back wall, over the wallpaper.
- The wallpaper was created by gluing craft scrapbook paper onto the back wall.
- The molding was created by gluing leftover craft ribbon onto the wallpaper where the two complementing patterns meet.
- The faux board and batten in the dining room was created with 3 pieces of white spray painted cardboard cut into various rectangular sizes. The largest rectangle was glued down first, the smallest rectangle was glued second, and the frame cutout shaped rectangle was glued down last. I loosely applied the tips from the beautiful tutorial at Dada’s dollhouse.
- The faux dining room light fixture was created by utilizing a small spool from craft ribbon, wrapping it in craft paper & additional ribbon, then threading a length of twine through the hole, tying off one end and taping the length along the ceiling.
- The rugs are a rectangular cut piece of felt and a circular cut piece from the same felt.
- The artwork is an open window frame cut from the cardboard dollhouse and some craft scrapbook paper
And finally, we move onto the bottom level of the dollhouse. This is the Living Room and Entry which I think I’ll make a Library, Office or Playroom.
Bottom Level

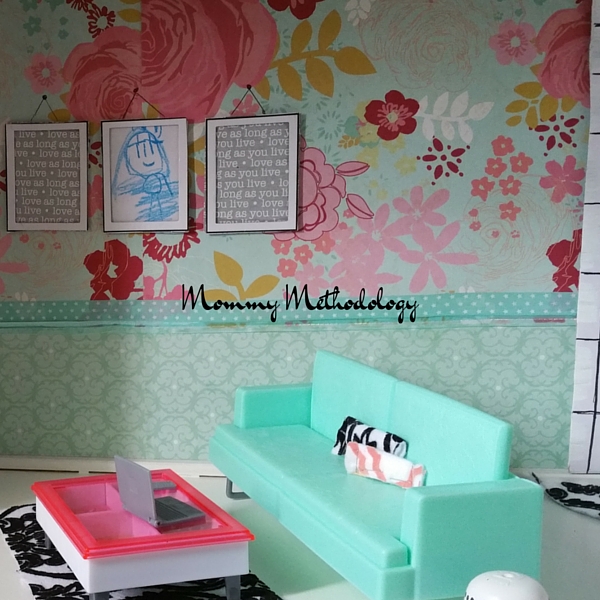
Living Room

Entry Library/Office/Playroom
- The windows, fireplace, light-switch, and TV were either taped with double-backed tape onto the side walls or glued, using Elmers glue, onto the back wall, over the wallpaper.
- The entry door was applied to the back wall in the same manner. I drew it free hand with a Sharpie on a large piece of cardboard from the recycled cardboard dollhouse.
- The wallpaper was created by gluing craft scrapbook paper onto the back wall.
- The molding was created by gluing leftover craft ribbon onto the wallpaper where the two complementing patterns meet.
- The faux paneling in the entry room was created with strips of white spray painted cardboard.
- The rugs are a rectangular cut piece of felt, a circular cut piece, and a fan shaped cut piece from the same felt.

Living Room Artwork
- The 3 pieces of artwork were created with an open window frame cut from the cardboard dollhouse and a postcard. The message reads, “love as long as you live.” The middle frame is an original drawing on construction paper by my 5-year old. 🙂 She helped me glue the art to the frames, then I glued them to the back wall of the dollhouse.
I may add white curtains to the front using a tension rod. And there are few other upgrades I’m considering. Overall, I’m pleased with the outcome! It pales in comparison to many of the beautiful DIY creations on Pinterest or on Erin Heaton’s site at Lansdowne Life. I’m particularly in awe of Dawn’s creation at Funky Junk Interiors! Regardless of my limited abilities in the DIY realm, it was a fun and cathartic project to do with my girls. 🙂
Since they play so roughly with their toys, I don’t have to worry that a more finely executed, detailed dollhouse would get ruined. And I’m super excited that I was able to repurpose the girls broken down cardboard dollhouse that would have just been thrown into the recycle bin otherwise.
Dare we say classic upcycling?
UPDATE 8/21/2015:
Barbie Moved In Her Furniture
The dollhouse is furnished now. Some pieces I bought off Amazon, and some are repurposed items. I’ve provided a link to the individually purchased items below. I suggest you wait till they are on sale as I did to save an extra $5 or so per set. Additionally, Prime
membership saves on shipping. If you can make more of your own furniture or purchase it second-hand, better yet, and Kudos to you; I didn’t have much success with either of those two avenues myself.

Furnished Bathroom
-

Vanity
-

Bedroom

Furnished Dining Room

Furnished Kitchen
-

Furnished Living Room ~ View 1
-

Furnished Living Room ~ View 2


Furnished Library
- The wall shelves were created with L-shaped cardboard inserted into the slots on the wall partitions.
- The bed was originally a hanging rope bed, but my girls pulled it from the ceiling. Then I made a canopy bed which they tore. So the end result with attempt #3 is a the lid of a shoebox, wrapped in felt and white duct tape, a cardboard headboard, 4 pencils as the posters wrapped in twine, and some gauze tied between the posters. I elevated the bed by glueing 3 applesauce cups to the bottom to give it a platform bed height.
- The bedside table is my favorite! I made it with a cardboard box, q-tips for legs and pieces of cotton as drawer knobs.
- The garden stool was made with a recycled bottle top, dipped in white paint and accented with black dots using a Sharpie.
- The lamp in the living room was made with a craft ribbon wheel, some ribbon, a miniature clothespin and a block of Magic Erasure as the base.
- The bookshelf is a repurposed jewelry tray.
- The stools are recycled storage containers, dipped in white paint and accented in a hand-drawn chevron pattern.
- The round coffee table is actually repurposed from an antique dollhouse tea set. I then created a tray for the top using a jarred candle lid lined with a piece of round felt.
- The flower arrangement on the coffee table is a green Lego topped with a toy lipstick tube.
- Here’s a link to the


P.S. What is your favorite DIY project?


